Making a video on a Mac is easy. In fact, Macintosh was the first platform to make video editing straightforward, although Windows has since caught up to a large extent. Still, iMovie is arguably the best free video editing software available because of the frequent updates that are implemented.
Here are the steps you will need to follow to make videos:
- A digital video camera (you already knew this though, right?:)) It can be a point and shoot camera with a video function, your cellphone, built in laptop camera or a camcorder. As long as it shoots video in digital form, it will work. You will know it’s digital because it will have a USB or FireWConecire port where you will be able to connect your Mac to your camcorder. If you have a very old camcorder that shoots onto analog tape, you can still make a video, but it’s beyond the focus of this article.
- Connecting cable. You need this to transfer the footage from your video camera to your computer (see the prior bullet). It will most likely be a USB cable.
- Editing software. Macs come with iMovie built-in by default. Not sure if you have it? Click on the magnifying glass in the upper right hand corner of your screen. Type in “iMovie” It may take a few seconds or even a few minutes on a slower system. You should see an Icon that says “Imovie” in the list under the Applications category. When you see the icon, double click on it to open the program. If you do not see the icon, you will need to purchase it.
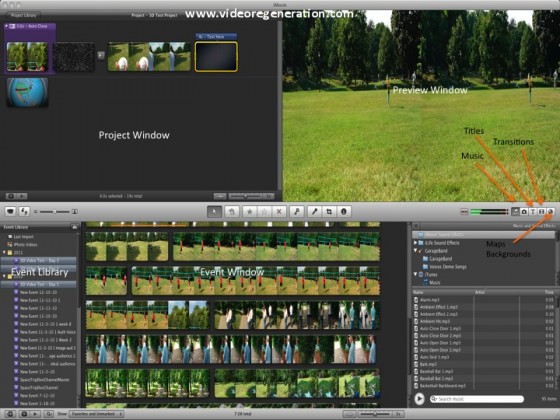
Within iMovie, there are five main areas you should be familiar with. The screen capture below displays each.
- The Project Window is where you’ll do most of your video editing.
- The Preview Window functions as a monitor where you can view you material in larger form.
- The ‘Event Window is where your original clips from your camcorder live.
- And that brings us to the last window, which is of course the Event Library. Think of this as the Finder where you can locate your video clips.
Great. Now you have loaded IMovie and presumably you have some awesome footage to edit. First we need to transfer video from your camcorder into IMovie. Here’s what to do:
- Turn your camera off (if it is on) and connect it to your computer either using a USB cable or a Firewire Cable.
- Open Imovie if it is not already open. Note that these instructions were written with Imovie 2011 in mind. However, I also tried these with IMovie 2008 and there were no major differences.
- Choose IMovie, Preferences and make sure that there is a check under “Show Advanced Tools”. We won’t be using them for this exercise, but it’s a good idea to have this turned on by default as you will likely want to use these functions in the future.
- Choose file, new project. Several options will present themselves. There are various project themes as well as movie trailers. For now, choose “no theme”. It is simple to work with a theme if you decide to try that later.
- Select ‘widescreen’ if you shot your video in HD. If you aren’t sure, ask this question. Is your video wider like a movie screen or more square in shape like an old TV screen. Most videos will be widescreen. If you still aren’t certain, choose that. Then choose 30fps if you are in North America or 25fps if you are in Europe. If you are in neither Europe nor the United States, find out what system is in common use where you live.
- Come up with a memorable name for your project and type it into the Project Name box.
- Turn on your camcorder.
- An ‘Import’ window may pop up immediately. If it does not, click on the camera icon located on the right hand side in the middle of the screen.
- In order to select the videos that you import, move the slider on the lower left hand side down to manual and click to place a check beneath each video clip you wish to import.
- Choose a location to save to where you will have enough disk space (you may need an external drive), choose ‘Create a New Event’ and select a name for your project.
- Finally choose either Optimize Video ‘Large’ or Full Size. Optimize video will reduce the file size and quality of your video. It is best to choose this option if you only plan on displaying your video on the web such as YouTube. If you want to screen your video on your high definition television, you will want to choose full original size. Original size will take up more disk space. Make sure you plan accordingly.
- Click ‘import’ and be patient while your video loads. Depending on how much content there is, it may take several minutes. A timer at the bottom of the screen allows you to monitor the progress.
Once your clip is imported it will appear in the Event Window. Each clip you want to include in our project needs to be dragged up to the Project Window. You can either click and drag to select a portion of the clip you wish to choose or option click to select the entire clip.
Once you have your clips up in the project window, you can click and drag them so they are in a new order. The order that they are in is the same order that they will be present in for your final film
If there are portions of each clip you would like to remove, you can continue to do so in the Project window. Click and drag to select the portion you wish to remove, then press delete
Add transitions:
Click on the transition icon (see the graphic). There are many transitions to choose from. Drag the one you would like and place it between the two shots you would like it to occur between Test it out by moving your cursor back and forth over the video.
Add music and sound effects:
Click on the music notation symbol to add music. Select a track. It can be a track that you created in garage band.
Add titles:
Click on the ‘T’ icon. Choose your title style. Enter title text. Drag it to you Project window and place it where you would like your titles to appear.
Add Maps & Icons:
These are a new addition to Imovie. The maps are great for travel videos or educational projects. As above, drag them into your project window and choose the one that works best for you.
Once you are finished, export your movie for the world to see! Click “Share” and then “Export Movie”. Choose a file name and a location to save your movie too. If you have been following along with these instructions, the default size of 960×540 will work on a wide range of devices. Try that out for now. Click ‘Export’.
Locate the file in the folder you specified. Your movie is ready to be screened or uploaded to YouTube. You have learned to make a video on a Mac. Congratulations!
Below is a YouTube demonstration. The video compression is kind of crappy – sorry if this causes anyone trouble. I will re-do it if enough people (one person is enough) complain.:)